")
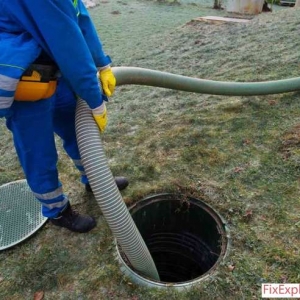
Installing a septic tank and drain field is not just a matter of digging a hole and dropping a tank into the ground. We are building a working wastewater treatment system that depends on gravity, soil filtration, bacterial digestion, and correct hydraulic flow. When it is installed properly, it can last for decades. When it is installed poorly, it can fail surprisingly fast.
A septic system works by separating solid waste from liquid effluent inside the tank, then sending that clarified liquid into the drain field where the soil finishes the treatment process. The drain field, also called a leach field, is where the real filtration happens. That is why every part of the installation matters, from the perc test to the outlet tee to the level of the distribution box.
| Symptom | Likely Culprit | Quick Test | DIY Fixable? |
|---|---|---|---|
| Effluent surfacing above trench lines | Soil permeability too low | Perc test slower than 60 min/inch | No |
| Sewage smell near distribution box | Outlet tee missing or misaligned | Inspect D-box inlet elevation | Sometimes |
| Tank fills too quickly after install | Groundwater intrusion | Check tank seams after rain | No |
| Grass greener over laterals | Early biomat overload | Probe trench moisture levels | Sometimes |
| Gurgling indoor drains | Improper slope between house and tank | Measure pipe fall per 10 ft | Yes |
What a Drain Field Actually Does
Many homeowners assume the septic tank does all the treatment. It does not. The tank handles separation and initial anaerobic digestion, but the drain field completes the wastewater treatment cycle. Inside the tank, heavy solids settle into sludge, fats and grease float into the scum layer, and the middle layer of liquid effluent flows outward through the outlet tee.
That liquid enters the drain field, where it moves through drain rock, perforated lateral lines, and surrounding soil. As it passes through the soil, harmful bacteria, nutrients, and suspended particles are filtered out. Oxygen in the upper soil layers also supports aerobic organisms that help finish the treatment process. This is why soil quality and trench design are critical to long-term performance.
Step 1: Perform a Soil Percolation Test Before Digging
The first real decision is whether the soil can handle a conventional system at all. We never treat this as optional because the drain field depends entirely on the soil’s ability to absorb and filter wastewater at the right rate.
The Action
Test how quickly water moves through the soil on the proposed installation site.
The Why
The drain field depends on soil percolation, often measured in minutes per inch. If the soil absorbs water too quickly, liquid effluent may pass through before proper treatment occurs, which can threaten groundwater. If it absorbs too slowly, trenches stay saturated and the system backs up. Either extreme can cause failure.
The Execution
Dig several test holes around 24 inches deep in the proposed drain field area. Pre-soak them by filling them with water twice, then refill and measure how quickly the water level drops. Use a tape measure, a bucket, and a stopwatch. In general, sandy soil may drain in about 5 to 15 minutes per inch, loam may fall in the 15 to 45 range, and clay can move much slower.
The Expected Result
A suitable conventional drain field site usually shows a consistent absorption rate in a workable range, often around 10 to 60 minutes per inch depending on local code.
The Pivot
If the soil drains too slowly, a conventional drain field may not be possible. At that point, the project often shifts to a mound system, aerobic treatment, or another engineered solution rather than forcing a standard trench system into unsuitable soil.
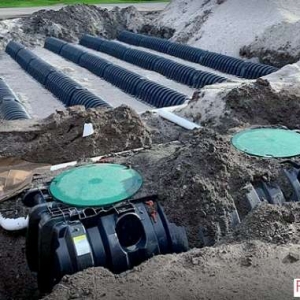
Step 2: Choose the Correct Septic Tank Size
Tank sizing is where many installations quietly go wrong. A tank that looks large enough can still be undersized once real household water use, guest loads, and hydraulic surges are considered.
The Action
Select a properly sized septic tank based on expected wastewater flow and household demand.
The Why
The tank must hold wastewater long enough for solids to settle and for anaerobic bacteria to begin digestion. If the tank is too small, the retention time drops, suspended solids leave too early, and those solids move into the distribution box and lateral lines. That shortens drain field life dramatically.
The Execution
In many residential systems, a 1000-gallon tank may serve a smaller 2- to 3-bedroom home, while larger homes often require 1250 gallons or more. Two-compartment tanks are preferred because they improve solid separation. Concrete tanks are durable and long-lasting, fiberglass is lightweight but needs careful anchoring in wet ground, and polyethylene resists corrosion but also requires stable bedding.
The Expected Result
The chosen tank should provide enough retention time to separate solid waste, maintain a stable liquid zone, and protect the drain field from solids carryover.
The Pivot
If the tank fills abnormally fast after installation, we check for leaking fixtures, roof drains illegally tied into the system, or groundwater infiltration through seams and risers.
Step 3: Respect Setback Distances Before Layout
A septic system cannot simply be placed wherever excavation is easy. The location has to protect wells, structures, property boundaries, and natural water sources.
The Action
Lay out the tank and drain field using local setback requirements before excavation begins.
The Why
Setbacks exist to prevent partially treated wastewater from migrating too close to drinking water sources, building foundations, and neighboring properties. Effluent can carry bacteria, nitrates, and phosphorus through wet soil if the system is placed too close to sensitive areas.
The Execution
Mark the tank and trench area with spray paint and string lines. Call utility locating services before digging. Typical rules often require the tank and drain field to stay a certain distance from houses, wells, property lines, and water bodies, but exact distances vary by code and must always be verified locally.
The Expected Result
The full system fits inside a legal, safe, and serviceable footprint with no risk of utility strikes or contamination conflicts.
The Pivot
If groundwater is found too high in the proposed trench zone, the layout usually needs to change, or the design must move to an above-grade or engineered alternative.
Step 4: Excavate and Bed the Septic Tank Properly
Tank stability starts at the base. We have seen plenty of systems fail not because the tank itself was defective, but because the excavation and bedding were rushed.
The Action
Excavate the tank hole to the proper dimensions and prepare a stable, level base.
The Why
A septic tank is heavy when full. If it sits on uneven clay lumps, soft mud, or poorly compacted soil, it can settle, twist, or shift. That movement throws off pipe alignment, stresses fittings, and can crack the tank or shear the inlet and outlet connections.
The Execution
Dig the tank hole slightly wider than the tank body so there is room for positioning and backfill. Place a level base of compacted sand, pea gravel, or approved bedding material. Never drop the tank onto a muddy or unstable floor and assume the backfill will fix it later.
The Expected Result
The tank sits level and fully supported, with no rocking, soft spots, or side pressure imbalance.
The Pivot
If the bottom of the excavation turns wet or unstable, the installation should stop until the base is stabilized with suitable material.
Step 5: Install the Inlet Tee and Outlet Tee Correctly
These fittings look simple, but they protect the entire system. A poorly installed tee can quietly destroy a drain field by letting solids move where they do not belong.
The Action
Install the inlet and outlet tees at the correct depths inside the tank.
The Why
The inlet tee directs incoming wastewater downward so it does not churn the scum layer excessively. The outlet tee is even more important because it draws liquid from the clear zone rather than the floating grease layer on top. If that outlet tee is missing, too short, or damaged, grease and solids can move into the drain field and clog the soil interface.
The Execution
Position the inlet and outlet according to the tank manufacturer’s measurements and code requirements. Many modern systems also include an effluent filter inside the outlet tee to catch suspended solids before they leave the tank.
The Expected Result
Only clarified liquid effluent exits the tank, and solid waste remains inside for proper separation and pumping.
The Pivot
If solids later show up in the distribution box or trench lines, the outlet tee or filter is one of the first components we inspect.
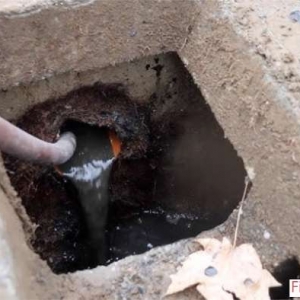
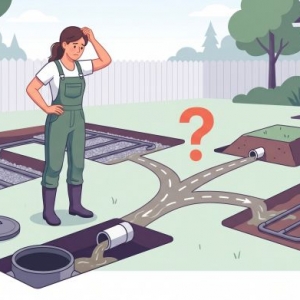
Step 6: Set the Distribution Box Perfectly Level
The distribution box is one of the smallest components in the system, but one of the easiest places to ruin the whole installation. A slight tilt is enough to overload one trench while starving the others.
The Action
Install the distribution box on a firm, level base and verify even outlet flow.
The Why
The D-box splits liquid effluent among the lateral lines. If one outlet sits lower than the others, most of the wastewater will flow there first. That trench will saturate faster, develop a heavy biomat sooner, and fail early while the other lines remain underused.
The Execution
Set the box on compacted gravel and use a laser level or precise hand level to confirm alignment in both directions. After connecting the inlet and outlets, pour water through the box to verify that it leaves evenly through all ports.
The Expected Result
Each lateral line receives roughly equal flow under normal operating conditions.
The Pivot
If one side receives more water during testing, the box must be re-leveled before the system is buried.
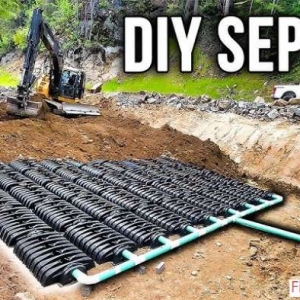
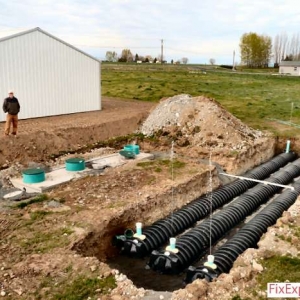
Step 7: Build the Drain Field Trenches and Lateral Lines
This is the part of the installation most people picture, but the details matter more than the trench itself. The wrong rock, wrong depth, or wrong pipe slope can cripple the field before it ever sees a full year of service.
The Action
Excavate drain field trenches and install lateral pipes with proper bedding and cover.
The Why
The trench creates a controlled infiltration zone where liquid effluent leaves the pipe, moves through drain rock, and contacts the surrounding soil. The trench depth affects oxygen availability, freezing risk, and long-term absorption. The lateral pipe has to distribute flow evenly, not dump it all at one end.
The Execution
Typical trenches are often around 18 to 36 inches deep and 2 to 3 feet wide, depending on design and code. Place washed drain rock in the bottom, lay perforated pipe with the holes oriented correctly, then add more rock above the pipe. Cover the rock with geotextile or approved barrier material before backfilling with soil so fines do not wash down and clog the voids.
The Expected Result
Effluent spreads evenly through the trench system and enters the soil slowly rather than flooding isolated sections.
The Pivot
If trenches begin taking groundwater during installation, the site is likely too wet for a conventional field and the design may need to change immediately.
Step 8: Protect the System During the First 90 Days
A newly installed septic system still needs time to stabilize biologically. The first few months matter more than most homeowners realize.
The Action
Control water usage and avoid harsh chemical shocks after installation.
The Why
The tank and drain field need time to establish a balanced microbial environment. Anaerobic bacteria in the tank help digest organic waste, while the drain field develops a thin biomat layer at the soil interface. That biomat is normal in moderation, but hydraulic overload can make it thicken too quickly and seal the trench floor.
The Execution
Spread laundry loads throughout the week. Fix leaking toilets immediately. Avoid dumping chlorine bleach, antibacterial cleaners, paint, solvents, or other harsh chemicals into the system. Many of these products disrupt the microbiome balance that keeps waste breakdown working normally.
The Expected Result
The system develops stable treatment performance without early ponding, odors, or wet spots over the laterals.
The Pivot
If the yard becomes soggy or unusually green over the field in the first year, hydraulic overload or trench imbalance may already be developing and should be evaluated quickly.
The Installation Mistakes That Shorten Drain Field Life Fast
Most early failures are not random. They usually trace back to a small number of installation mistakes that create a chain reaction underground.
- Missing outlet protection: Without a proper outlet tee or effluent filter, suspended solids enter the drain field and begin clogging the soil interface.
- Bad trench slope: If lateral lines pitch too steeply, wastewater runs to one end instead of dispersing evenly through the trench.
- Wrong bedding material: Dirty or fine-filled rock reduces open space and restricts liquid movement around the pipe.
- Poor water management: A leaking toilet flapper can overload the system continuously, push unsettled solids through the tank, and accelerate biomat failure in the field.
Safety Warnings We Never Ignore Around Septic Installations
Septic work is not just dirty. It can be deadly. Methane and hydrogen sulfide can collect inside tanks, and both confined-space hazards and structural collapse risks are real.
- Never enter a tank: Septic tanks can contain oxygen-poor air and toxic gases that cause rapid collapse or unconsciousness.
- Never lean inside: Even opening a tank and breathing deeply over it is unsafe.
- Never trust old lids: Rusted steel or deteriorated concrete lids can collapse under body weight.
- Always locate utilities: Digging without a utility locate can strike power, gas, or water lines.
Frequently Asked Questions
How deep should a septic drain field be installed?
Most drain fields are installed around 18 to 36 inches deep, but the correct depth depends on soil conditions, frost line, oxygen access, and local code.
How long does it take to install a septic tank and drain field?
Most residential installations take about 1 to 3 days once permits, layout, and equipment are ready, though poor weather and difficult soil can extend that timeline.
Can a homeowner install a septic system without hiring a contractor?
Sometimes, but local rules often require permits, inspections, and approved designs, so legal requirements need to be confirmed before any digging begins.
How big should the drain field be?
The field size depends on daily wastewater flow and soil percolation rate. Faster-draining soil usually needs less trench length, while slower soil needs more treatment area.
What is the lifespan of a properly installed septic drain field?
A properly installed and well-maintained drain field can often last 25 to 40 years, especially when solids are kept inside the tank and water use stays within design limits.
Conclusion
Installing a septic tank and drain field the right way means building a balanced treatment system, not just burying plumbing components in the yard. The tank must separate waste effectively, the distribution box must split flow evenly, and the soil must be capable of finishing the treatment process without becoming saturated.
When we match the tank size to real flow, respect setback distances, install the tees correctly, level the D-box precisely, and protect the field from overload, the system can run quietly for decades. Miss those details, and the drain field becomes one of the most expensive failures a homeowner can face.