If you’re retrofitting an apron-front sink into a finished kitchen, the success lives or dies on planning, support, and clean cuts. Here’s how I approach it in real houses so the sink sits level, the front reveal looks intentional, and nothing leaks. We’ll cover layout, cabinet modifications, cutting stone or wood tops, support framing, and plumbing adjustments. I’ll also flag when to pause and call a fabricator.
Layout and cuts: how to install a farmhouse sink in existing countertop
Start by confirming the sink’s dimensions and the cabinet’s realities. Most apron-fronts need a 33–36 inch base cabinet, but the usable opening is what matters. Measure the sink body (width, height, and depth), apron height, and lip thickness. Compare those to the cabinet interior and the existing cutout. Decide your reveal: flush (edge aligns with sink), positive (counter overhangs sink slightly), or negative (counter set back a hair). For retrofits, flush or slight positive reveals hide small cut inconsistencies best.
Use the manufacturer’s template as a starting point, but verify it against the physical sink—templates are sometimes generous. Tape the template to the countertop, square it to the cabinet face, and check clearances to the backsplash and faucet holes. Mark the apron opening on the cabinet face, too; you’ll be removing a section there.
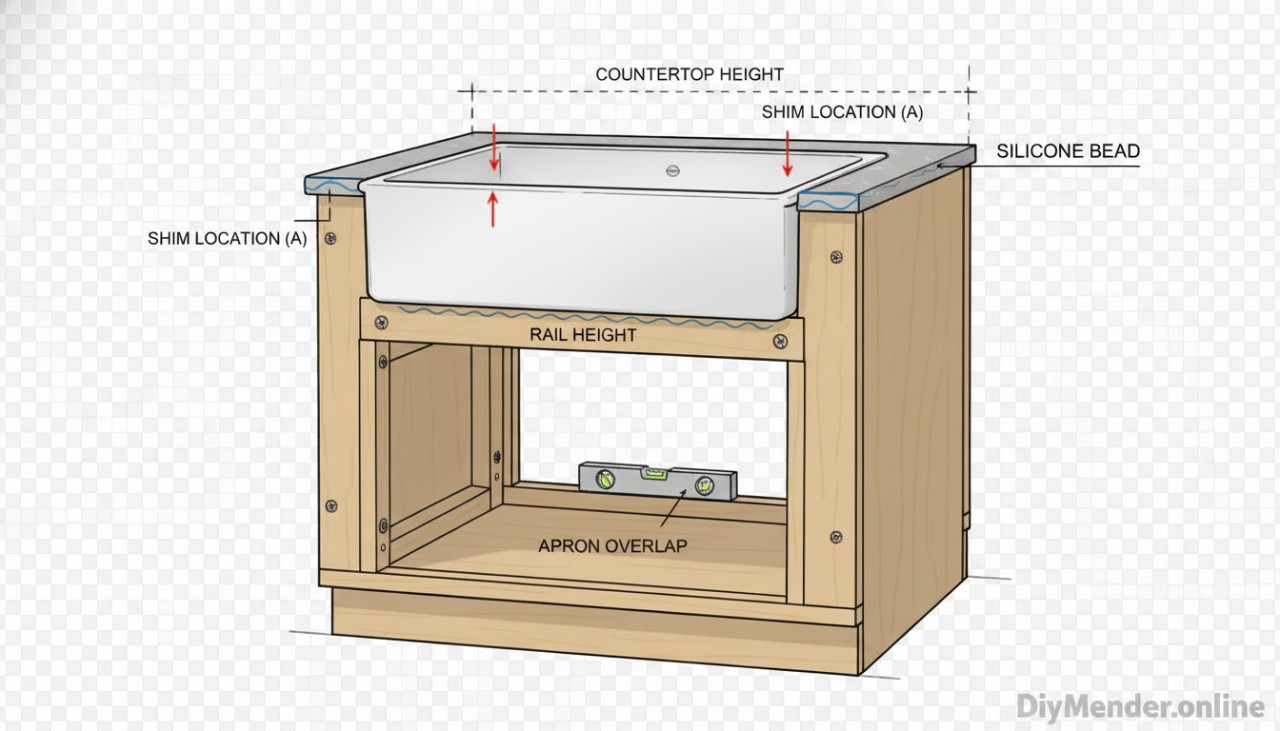 farmhouse sink set on 2x4 side rails: labeled shim locations, rail height relative to countertop, apron overlap on cabinet face, and silicone bead placement; include fasteners and level references; DiyMender.online watermark" title="Cutaway illustration of a base cabinet with a farmhouse sink set on 2x4 side rails: labeled shim locations, rail height relative to countertop, apron overlap on cabinet face, and silicone bead placement; include fasteners and level references; DiyMender.online watermark" class="overly-article-img">
Tools and materials that make the job smoother
- Measuring tape, combination square, level, and scribe
- Oscillating multi-tool and jigsaw for wood/laminate; angle grinder with diamond blade and a track/plunge saw with stone-rated blade for stone
- Drill with carbide/glass bits for faucet or accessory holes
- 2x4s or 2x3s for a support cradle, construction screws, and pocket screws if needed
- Shims (composite or plastic), painter’s tape
- 100% silicone sealant (kitchen/bath), plumber’s putty (if compatible with your drain), and Teflon tape
- Bucket, towels, and a helper—sinks are heavy
Assess the countertop before cutting
What you’re cutting dictates your approach:
- Laminate or wood: Most forgiving. Tape cut lines to reduce chipping. Use sharp, fine-tooth blades and support the offcut.
- Butcher block: Easy to cut, but must be sealed well around the sink. Dry-fit and oil/finish exposed cuts before final install.
- Quartz/granite: Feasible with the right blades and dust control, but easy to chip. Cut from the finished face with painter’s tape, use a guide for straight edges, and support the slab. If the sink front cut removes a large section of stone, it’s safer to have a fabricator make the opening to avoid a crack.
- Solid surface: Cuts cleanly but needs careful sanding to finish edges. Follow manufacturer’s dust precautions.
If your countertop has a thin front rail or narrow stone strip at the front, beware: removing material for the apron can leave it weak. A reinforcing steel strap epoxied beneath or a professional recut may be necessary.
Prepare the cabinet and build a support cradle
Apron-front sinks rarely hang from the countertop alone. Plan to support the sink from the cabinet with a cradle or side rails:
- Remove doors and drawers from the base cabinet. Protect the floor of the cabinet with cardboard.
- Mark and cut the cabinet face for the apron height. An oscillating tool keeps cuts controlled. Save the cutout as a color/finish sample in case you need touch-ups.
- Build a support: Either two 2x rails screwed into the cabinet sides at the final sink height or a full cradle (front and back rails tied together). The top of the support should sit about 1/16–1/8 inch below the final sink rim height to allow for shims and sealant.
- Check level left-to-right and front-to-back. Pre-shim if your floor or cabinet is out of level.
Dry-fit the sink onto the supports. You want the apron to sit proud of the cabinet face evenly, usually by 1/16–1/8 inch, unless the design calls for fully flush.
 with 1/8 in annotations, square references from stiles, and centerline marks; clean, readable lines; DiyMender.online watermark")
Mark and cut the countertop opening
With the sink dry-fit, mark the final cut lines on the countertop using the actual sink as your guide. Tape the lines. For wood or laminate, drill relief holes at corners and cut slowly, keeping the base of the saw flat and supported. For stone, score shallow passes first with a diamond blade and a straightedge; keep the grinder steady and let the blade do the work. Vacuum dust immediately and wear appropriate protection.
Before making the apron notch at the front edge, clamp a sacrificial board to the countertop’s underside to prevent blowout. Support all pieces so nothing drops or twists during the final cut.
Dry-fit again and adjust for a clean reveal
Set the sink into the new opening. Check three things: the reveal along the cut edge, the apron alignment to the cabinet face, and the level. Tiny gaps can be tuned with shims under the sink rim or on the support rails. If the reveal is uneven by more than a couple of millimeters, lightly plane/sand wood or adjust the cut line where feasible. With stone, small inconsistencies are best hidden with a slight positive reveal and a clean silicone line.
Seal and set the sink
When satisfied with the fit, run a continuous bead of silicone along the underside of the countertop where the sink rim will contact, and along the top of the apron where it meets the cabinet face if that joint is tight. Lower the sink in evenly. Press gently to seat it, shim to perfect level, then wipe excess silicone immediately. If your model includes mounting clips or brackets, install them now while the silicone is still workable.
Plumbing adjustments that usually come up
Apron sinks often sit deeper, dropping the drain. That can misalign the P-trap. Loosen slip nuts, dry-fit the new tailpiece and trap, and ensure a continuous downward slope to the wall arm. If you have a garbage disposal, you may need a shorter tailpiece or to raise the trap arm at the wall. Keep the trap weir below the wall outlet to maintain a water seal. This is also the time to replace old supply lines and shutoff valves if they’re crusty or stuck.
- Use plumber’s putty or the gasket specified by your drain kit—some finishes (like certain composites) require silicone instead.
- Hand-tighten slip joints, then add a quarter turn. Over-tightened plastic nuts crack later.
- If you removed or shifted the dishwasher air gap or vacuum breaker, ensure the hose routing still forms a proper high loop.
Protect the cut edges
Exposed wood or particle board around the cutout needs sealing to prevent swelling. Brush on a thin coat of polyurethane or shellac on wood; for laminate substrate, paint edges with a waterproofing primer. On stone, clean dust thoroughly with denatured alcohol before running your final silicone bead.
Special cases and gotchas
- Backsplash clearance: Tall aprons and thick countertops can push the sink too close to the backsplash, leaving no room for faucet nuts. Measure your faucet’s mounting hardware height; you may need to drill faucet holes before setting the sink or choose a deck-plate that fits.
- Face-frame cabinets: Removing too much of the center rail can weaken the face. Reinforce with a horizontal cleat glued and screwed inside, or pocket-screw a new rail that frames the apron cleanly.
- Inset doors: Aprons can interfere with door swing. Dry-fit doors to confirm clearances after the apron cut.
- Quartz/granite warranty: Cutting on-site can void warranties. If your slab is under warranty, schedule a fabricator for the apron notch and final opening.
- Weight: Cast iron and fireclay sinks are heavy. Verify your cabinet floor and side panels aren’t sagging. Add center supports if needed.
When to bring in a pro
If your countertop is stone and the apron cut removes a long, thin strip at the front, call a fabricator—cracks there are expensive. Same if you need to relocate the drain line in the wall or modify electrical for a disposal or hot-water dispenser. Everything else is fair game for a careful DIYer with the right blades and dust control.
Final checks and leak test
- Fill the sink fully and let it sit 10–15 minutes. Check every joint and the cabinet bottom for drips.
- Run the disposal (if installed) while flushing with water to check for vibration-related leaks.
- Inspect the silicone bead the next day and touch up any thin spots.
Small refinements that make it look built-in
- Scribe the apron lightly to the cabinet face if your walls aren’t square, then touch up with matching paint or finish.
- Choose a consistent reveal and stick with it around the whole opening—even 1/16 inch variation is visible at eye level.
- If your countertop edge is raw after cutting, add a micro-bevel with sandpaper (wood) or a diamond pad (stone) for a finished look.
Take your time, support the sink properly, and cut once. A clean layout and a stout cradle are what separate a tidy retrofit from a headache.