
If you’re trying to figure out what makes a sink ADA compliant, it comes down to a few exact measurements and a couple of common-sense safety details. As a homeowner who’s retrofitted bathrooms for relatives using wheelchairs and walkers, I’ve learned that the right setup makes daily routines easier and safer for everyone.
Quick answer: An ADA-compliant sink has a rim or counter at 34 inches max above the floor, clear knee and toe space underneath (with specific depths), a 30 by 48 inch clear floor area for a forward approach, insulated or protected hot and drain pipes, and easy-to-use faucet controls (lever, push, or sensor) that work with one hand using 5 pounds of force or less.
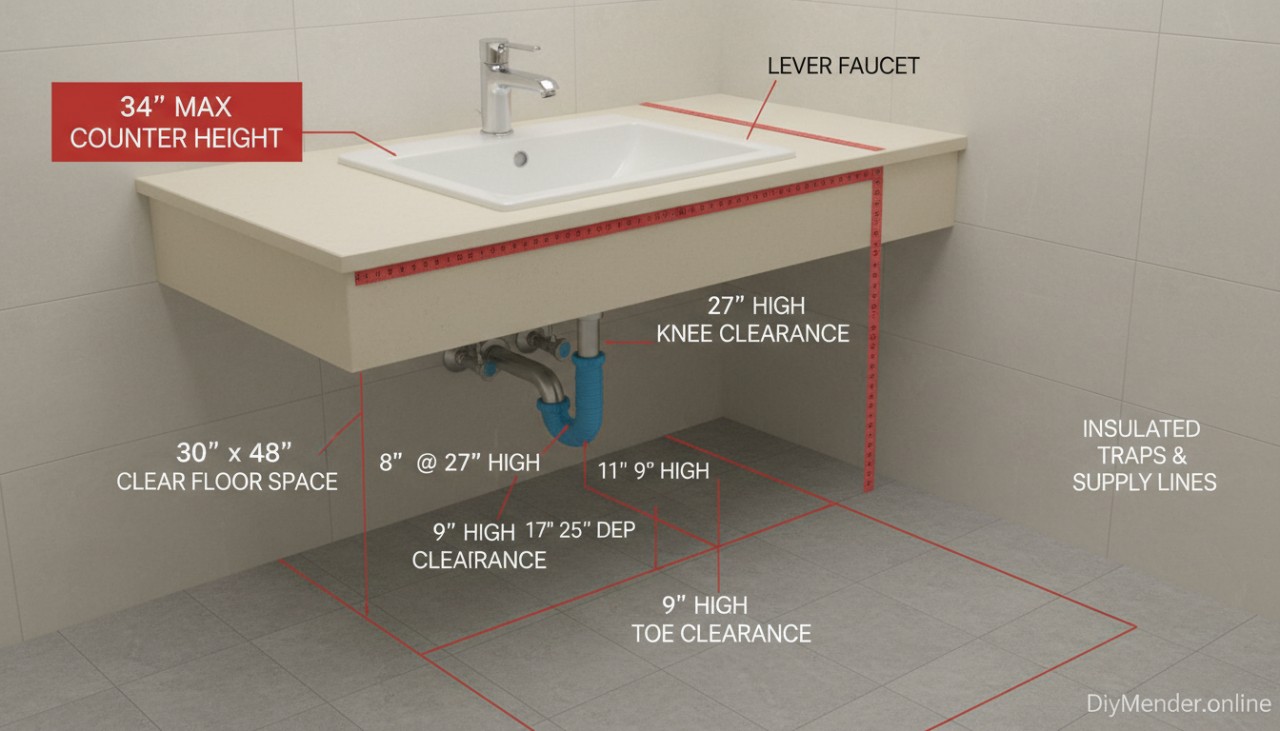
What ADA compliance means for sinks
ADA standards focus on usability for people who use wheelchairs, scooters, or who have limited hand strength. For sinks (especially lavatories in bathrooms), the rules are about two things: can someone roll up to it and fit their knees and feet, and can they operate the faucet without strain? The backbone of compliance is consistent, predictable dimensions that work for most users.
Key dimensions and features you must meet
- Rim or counter height: 34 inches maximum above finished floor.
- Clear floor space: 30 inches by 48 inches minimum, positioned for a forward approach to the sink.
- Knee clearance: 27 inches high minimum at the front edge. Depth measured under the sink should be at least 8 inches at the 27-inch height, increasing to 11 inches minimum at 9 inches above the floor, up to a maximum depth of 25 inches.
- Toe clearance: 9 inches high minimum, 17 to 25 inches deep under the sink.
- Width of clear space: 30 inches minimum under the sink where knees fit.
- Exposed pipes: hot water supply and drain surfaces protected from contact (insulated, boxed-in, or guarded), with no sharp edges.
- Faucets: operable with one hand; no tight grasping, pinching, or twisting; 5 pounds of force or less. Lever, push, touch, or sensor faucets work well.
- Reach to controls: faucet handles and soap dispensers should be within comfortable forward reach—avoid setting them far back on deep counters.
 bathroom sink: 34" max counter height, 30" x 48" clear floor space, 27" high knee clearance with depth notes (8" at 27" high, 11" at 9" high, up to 25" max), 9" high toe clearance 17–25" deep, insulated traps and supply lines, lever faucet. Neutral bathroom setting, tape measures showing dimensions, watermark: DiyMender.online in a subtle bottom corner." title="Clean, labeled diagram of an ADA-compliant bathroom sink: 34" max counter height, 30" x 48" clear floor space, 27" high knee clearance with depth notes (8" at 27" high, 11" at 9" high, up to 25" max), 9" high toe clearance 17–25" deep, insulated traps and supply lines, lever faucet. Neutral bathroom setting, tape measures showing dimensions, watermark: DiyMender.online in a subtle bottom corner." class="overly-article-img">
Why these details matter
Those inches aren’t arbitrary. The 34-inch cap keeps the sink low enough for a seated user. Knee and toe clearance allow a wheelchair’s footrests and knees to move in under the basin. Clear floor space provides the forward approach. Protected pipes prevent contact burns and abrasions—an easy safety upgrade many people overlook. Faucet requirements ensure someone with limited grip or strength can turn water on and off without pain.
Common setups that fail compliance
- Full-height vanity cabinets under the sink that block knee/toe space.
- Vessel sinks or thick counters that push the rim above 34 inches.
- Deep counters placing the faucet too far back to reach comfortably.
- Exposed metal P-traps and hot supply lines with no insulation.
- Round knobs that require tight twisting to operate the faucet.
- Floor mats or storage bins crowding the 30 x 48 inch approach area.
How to make an existing sink ADA friendly
Step-by-step homeowner checklist
- Measure height: From floor to sink rim or counter—adjust to 34 inches max. If you’re high by a small margin, lowering brackets or selecting a thinner top can fix it.
- Open the knee space: Remove cabinet doors and interior shelves under the lavatory, or switch to a wall-hung sink or shallow apron-front vanity designed for accessibility.
- Verify clearances: Confirm 27 inches knee height and toe clearance (9 inches high, 17–25 inches deep). Check depth under the sink: 8 inches minimum at 27 inches high, expanding to 11 inches at 9 inches high, up to 25 inches max depth.
- Protect pipes: Add pipe wrap or a protective cover kit to hot supply lines and the trap. Secure edges and avoid exposed metal where knees could contact.
- Upgrade the faucet: Install a lever-handle or sensor faucet. Keep it within a comfortable forward reach; avoid placing it far rearward on deep counters.
- Clear the floor space: Keep a 30 x 48 inch area in front of the sink free of bins, scales, or rugs that snag caster wheels.
- Add reachable soap and towel: Mount accessories where they can be reached without leaning far over the counter.
Choosing fixtures that meet the standards
For a quick retrofit, a wall-hung sink or ADA-rated vanity with a recessed front is the simplest path to clear knee space. Look for shallow basins that leave room for the trap to sit higher. A single-lever faucet is dependable and inexpensive; sensor faucets are great for hands-free use, but make sure the sensor range doesn’t require awkward reaching. If you prefer a counter, keep the top thin and avoid vessel bowls that add extra height.
When you should consider professional help
Call a pro if lowering the counter means moving plumbing, if walls need reinforcement for a wall-hung sink, or if you’re not confident reworking drain heights. In older homes with galvanized or brittle piping, a plumber can reconfigure lines to create better knee space and install heat-resistant pipe covers cleanly.
Small details that improve day-to-day use
- Rounded counter edges where knees may contact.
- Anti-scald mixing valves set to a safe maximum temperature.
- Mirror placement low enough for a seated user—centered thoughtfully above the sink.
- Task lighting aimed at the basin to reduce glare and shadows.
Verification tips
Use a tape measure and a level. Double-check height from finished floor, not subfloor. Confirm clear floor space after rugs and mats are placed. Sit in a chair to simulate approach and reach; if the faucet or soap forces you to lean far forward, rethink placement even if your measurements technically pass. Real usability is the goal.

FAQ
Does every sink in a home have to be ADA compliant?
No. ADA standards are mandatory for public accommodations and certain multifamily settings. In a private home, use these guidelines to make at least one bathroom sink accessible for the person who needs it.
Can I keep a cabinet under the sink and still comply?
Only if the cabinet doesn’t block the required knee and toe clearances. Most standard vanities fail this. Some ADA-style vanities have a recessed or open section under the bowl—those can work.
What faucet types count as compliant?
Lever, push, touch, or sensor faucets that operate with one hand, without tight grasping or twisting, and with 5 pounds of force or less. Typical round knobs usually don’t qualify.
How high can the sink be?
34 inches maximum to the rim or counter surface. Vessel bowls typically push you over this limit unless the counter is lowered accordingly.
Do I have to insulate the pipes?
Yes, hot water lines and the trap should be insulated or guarded so knees and legs won’t contact hot or abrasive surfaces. Pre-formed covers make this easy.
Long-term best practices
- Keep the approach area clear—no baskets or step stools under the bowl.
- Check pipe insulation yearly and replace if it loosens or cracks.
- Test faucet operation periodically; if it stiffens, repair or replace.
- When remodeling, choose wall-mounted sinks or shallow vanities first; design everything else around the required clearances.
A sink that meets these dimensions and features won’t just “pass a checklist”—it will be easier and safer to use every day. If you focus on the 34-inch height, open knee/toe space, protected piping, and an easy faucet, you’ll cover what makes a sink ADA compliant in practical, real-world terms.